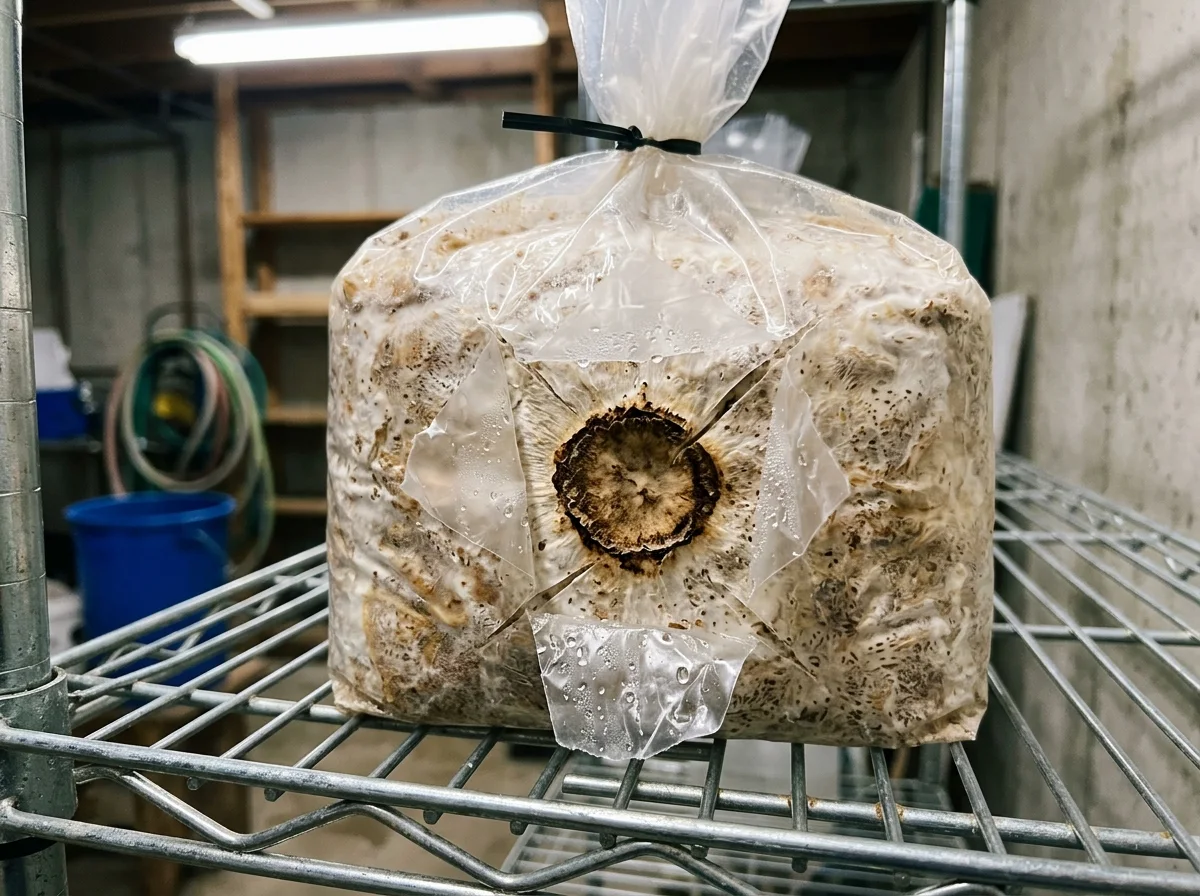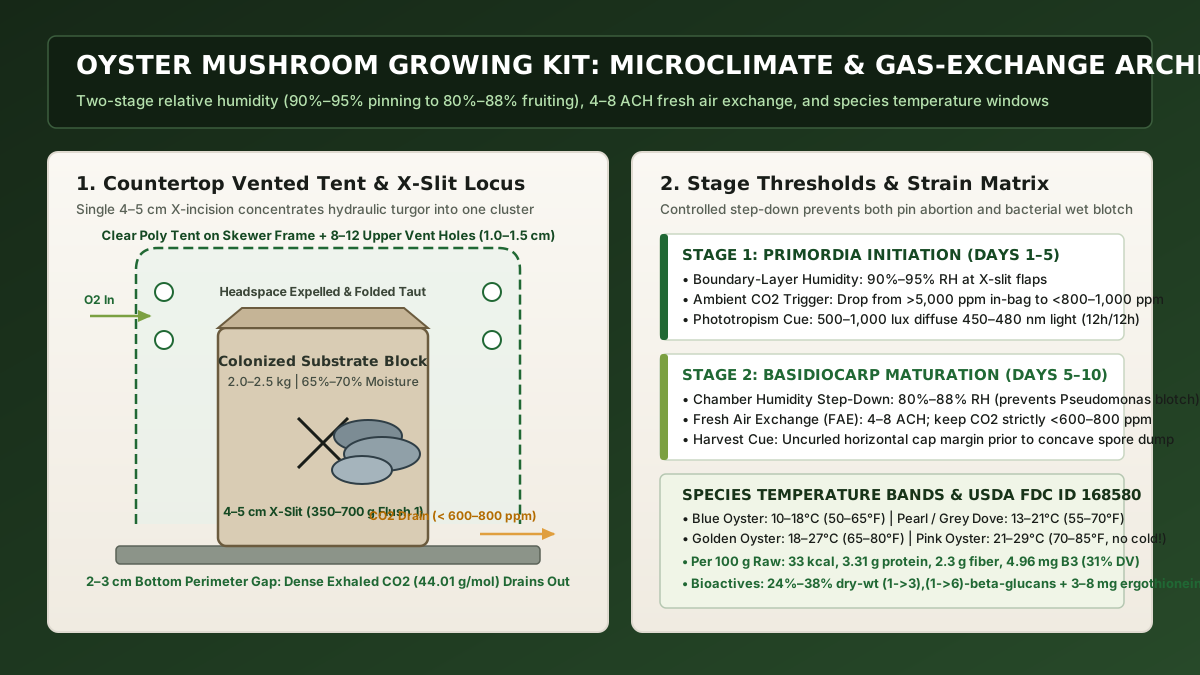
Sealing an oyster mushroom growing kit inside an unvented plastic bag or spraying coarse water streams directly onto emerging pins causes spindly stems, shriveled primordia, and slimy bacterial blotch that damage the block and cause the first harvest to fail. To fruit a dense cluster from a colonized block, fold the bag headspace taut, cut a single 4 to 5 cm X-slit, hold 90% to 95% relative humidity (RH) during Days 1 to 5 of pinning, and step down to 80% to 88% RH with 4 to 8 air changes per hour (ACH) so ambient carbon dioxide (CO2) stays below 600 to 800 ppm during cap expansion.
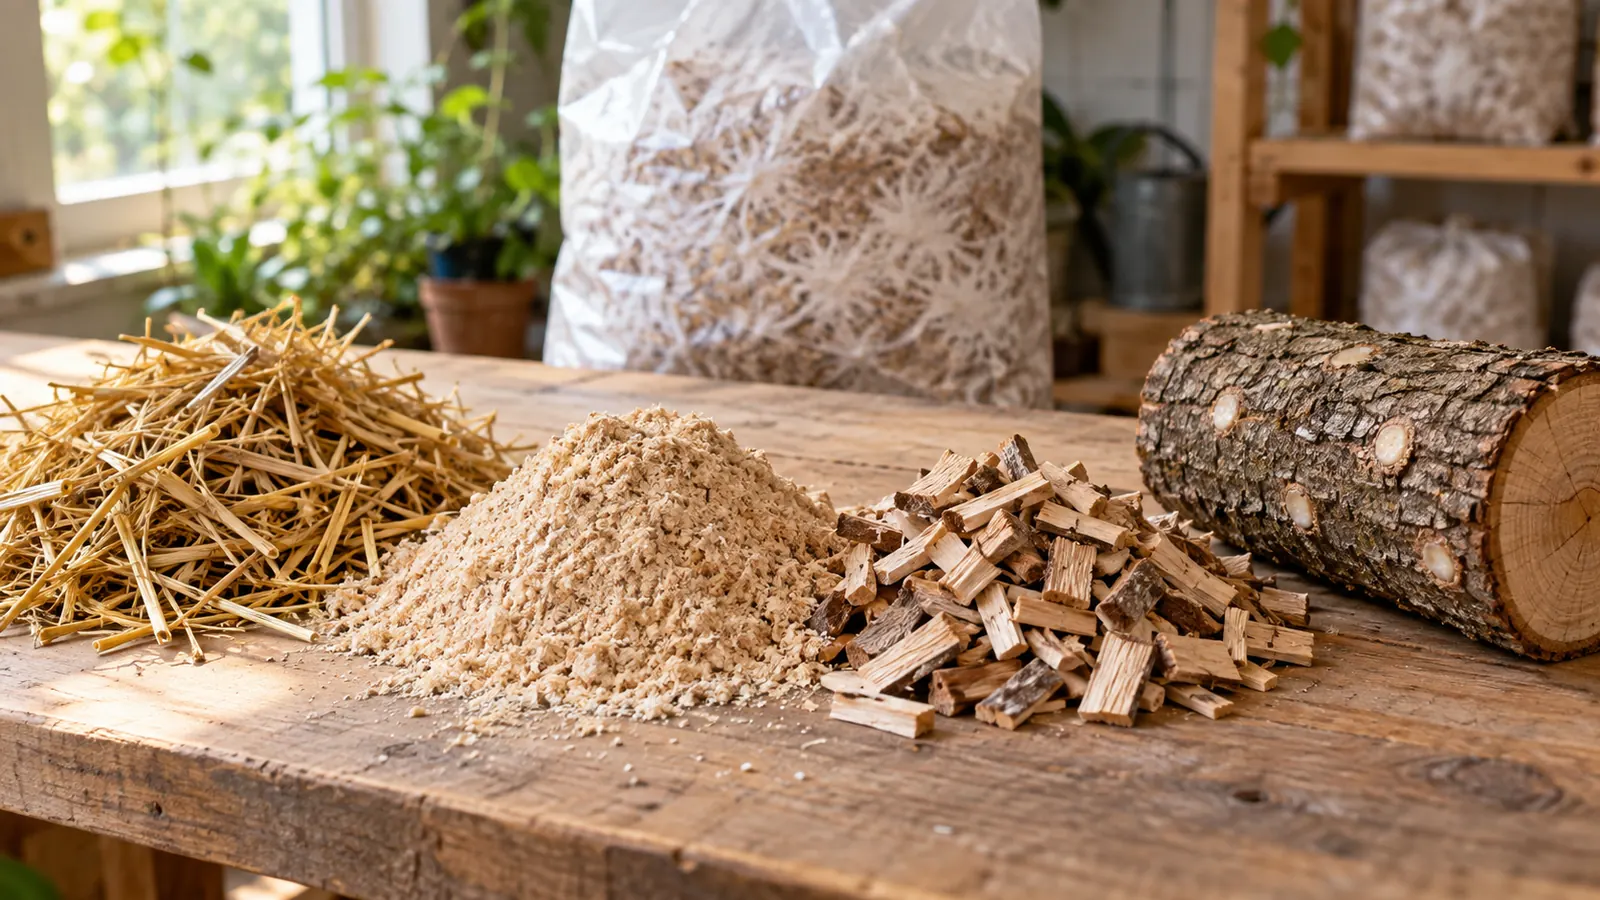
Commercial ready-to-fruit blocks arrive pre-colonized after 14 to 28 days of vegetative mycelial growth on pasteurized wheat straw, cottonseed hulls, or supplemented hardwood sawdust at 65% to 70% internal moisture (Cornell Small Farms Program; Penn State Extension). While sealed inside the filter-patch bag, Pleurotus mycelium tolerates 5,000 to 20,000 ppm CO2 (0.5% to 2.0%), which speeds hyphal colonization and prevents premature pinning during transit. Once you slice the bag on a kitchen counter, the physiological rules reverse: exposed hyphal knots require an immediate drop in CO2 below 800 to 1,000 ppm, 500 to 1,000 lux of diffuse daylight-spectrum light, and a protected boundary layer that prevents room drafts from desiccating primordia.
This cultivation guide is compiled by Known Source Farms, an independent agricultural publication in our mushrooms section. If you are comparing raw straw, cottonseed hulls, or hardwood sawdust before making blocks from spawn, start with our mushroom substrate selection guide. Once you twist off your first harvest cluster, use our oyster mushroom second-flush care guide to match post-harvest rest or rehydration to your block supplier.
| Growth Stage or Strain | Target Temperature | Relative Humidity (RH) | Ambient CO2 & Airflow | Light & Phototropism Cue | Primary Extension / Supplier Reference |
|---|---|---|---|---|---|
| In-Bag Colonization Baseline (Days -28 to 0 before opening) | 20–24°C (68–75°F) incubation | 65%–70% internal substrate moisture (67%–69% Penn State mix) | 5,000–20,000 ppm CO2 inside sealed filter-patch bag; 0 ACH |
Darkness or ambient storage; no phototropic cue needed | Penn State Extension; Cornell Small Farms |
| Stage 1: Primordia Initiation / Pinning (Days 1 to 5 after X-slit) | Match species band below | 90%–95% RH inside X-slit flap micro-baffle and vented tent | < 800–1,000 ppm CO2 (ideally 500–800 ppm); gentle convective venting |
500–1,000 lux (50–95 fc) indirect daylight or 450–480 nm LED, 12 hr on / 12 hr off | UF/IFAS SS662; Field & Forest Products |
| Stage 2: Basidiocarp Maturation (Days 5 to 10 cap expansion) | Match species band below | 80%–88% RH (step down 5%–10% to prevent standing water films) | < 600–800 ppm CO2; 4–8 ACH plus 3–4× daily manual tent flushing |
500–1,000 lux indirect light; zero direct sunlight on plastic tent | Penn State Extension; UKY Extension CCD-CP-079 |
| Blue Oyster (P. ostreatus var. columbinus) | 10–18°C (50–65°F) for deep slate-blue caps; greyer above 20°C | 90%–95% Stage 1 -> 80%–85% Stage 2 | High FAE demand (< 600 ppm CO2 for thick, short lateral stems) |
500–1,000 lux required for dark pileus pigment synthesis | Field & Forest Products; Penn State Extension |
| Pearl / Grey Dove Oyster (Pleurotus ostreatus) | 13–21°C (55–70°F) wide temperate countertop window | 90%–95% Stage 1 -> 80%–88% Stage 2 | < 600–800 ppm CO2; 4–8 ACH |
200–1,000 lux diffuse room or cool-white fluorescent/LED light | Field & Forest Products; UF/IFAS SS662 |
| Golden / Yellow Oyster (Pleurotus citrinopileatus) | 18–27°C (65–80°F) warm room or summer countertop | 90%–95% Stage 1 -> 82%–88% Stage 2 | < 700 ppm CO2; fragile hollow stems if CO2 exceeds 1,000 ppm |
500–1,000 lux preserves bright yellow pileus cuticle color | Field & Forest Products |
| Pink Oyster (Pleurotus djamor) | 21–29°C (70–85°F) tropical band; stalls < 15°C (60°F) |
90%–95% Stage 1 -> 85%–90% Stage 2 | < 800 ppm CO2; never refrigerate block (2–4°C kills mycelium) |
500–1,000 lux; rapid 5–7 day pinning-to-harvest cycle | UF/IFAS SS662; Field & Forest Products |
Bag Headspace Expulsion, X-Slit Mechanics, and Vented Humidity Tent Design
When setting up a grow mushrooms at home kit, how you fold the polypropylene bag before making the first cut determines whether the block channels its hydraulic turgor into one heavy 350 to 700 g bouquet or wastes its carbohydrate reserves on dozens of stalled pins underneath the plastic.
1. Expel Trapped Headspace Air Before Cutting
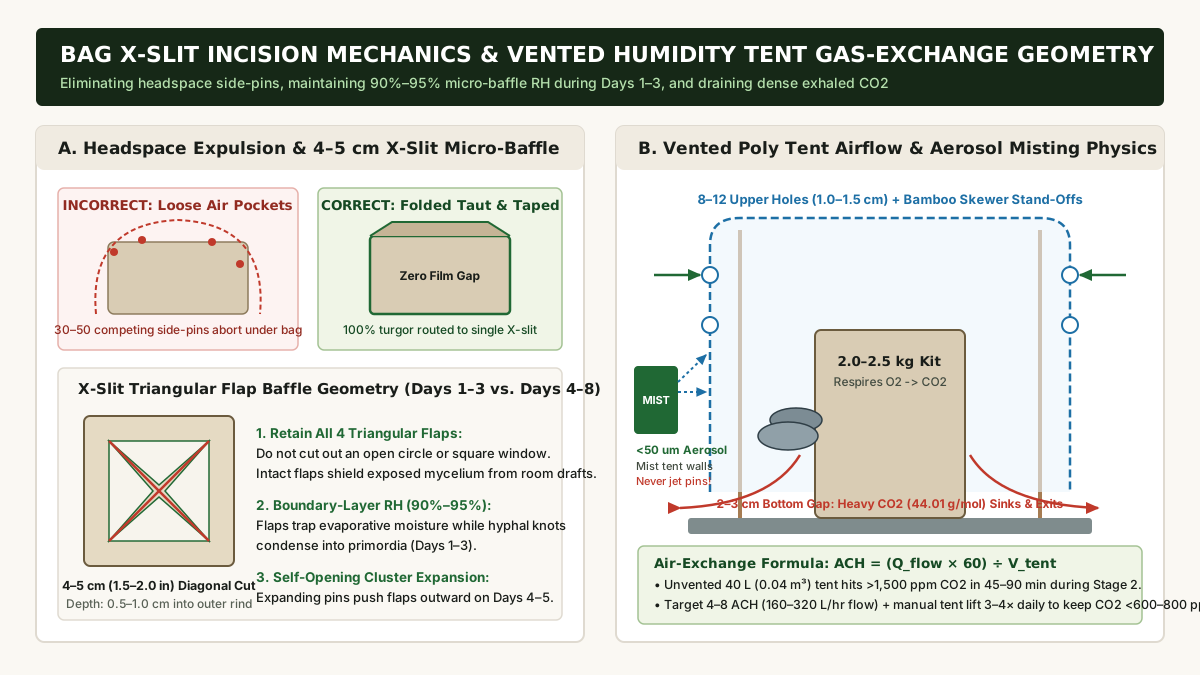
Filter-patch fruiting bags include 15 to 25 cm of upper headspace above the colonized sawdust or straw block so air can circulate through the microporous filter patch during incubation. Before cutting a fruiting opening, press all loose air out of the top of the bag, fold the excess plastic tightly flat against the top or back face of the block, and tape or tuck it underneath the block (Field & Forest Products).
If loose air pockets remain between the polypropylene film and the white mycelial surface, water vapor condenses inside those gaps at 95% to 100% RH while room light penetrates the transparent plastic. That micro-environment triggers 30 to 50 competing side-pins under the bag film. Because those trapped pins cannot access fresh air, they abort into slimy, oxygen-starved stubs that deplete block moisture and invite green Trichoderma mold.
2. Cut One 4 to 5 cm X-Slit and Keep the Triangular Flaps Intact
With the plastic pulled drum-tight across the front face of the block, use a clean utility blade or sharp knife wiped with 70% isopropyl alcohol to slice a single 4 to 5 cm (1.5 to 2.0 in) X-shaped incision through the plastic and roughly 0.5 to 1.0 cm into the outer mycelial rind (UF/IFAS Extension SS662).
Do not peel away the plastic or cut an open circular window. Leaving the four triangular plastic flaps intact creates a passive two-stage micro-baffle:
- Days 1 to 3 (Hyphal Knot Condensation): The four triangular flaps rest lightly over the incision, shielding the exposed substrate from dry room air currents and holding boundary-layer humidity at 90% to 95% RH while evaporative cooling signals hyphal knots to condense into dense white primordia.
- Days 4 to 8 (Cluster Expansion): As the primordial cluster swells, its mechanical turgor pushes the four plastic flaps outward automatically, exposing the developing caps to higher fresh air exchange right when respiration accelerates.
- Single-Locus Yield Concentration: Restricting surface evaporation to one 4 to 5 cm opening directs water and dissolved nutrients from the entire 2.0 to 2.5 kg block into one harvestable cluster rather than splitting pressure across multiple weak openings.
3. Build a Convective Vented Polyethylene Tent
Indoor kitchen and apartment countertops typically sit at 35% to 55% RH, which is far below the 90% to 95% RH required for Stage 1 pinning. However, draping an unperforated plastic bag tightly down to the table surface suffocates the block within an hour.
Construct a self-venting countertop humidity tent using three geometric rules:
- Internal Stand-Off Frame: Insert four bamboo skewers into the corners of the block (or place a wire hoop over the drip tray) so the clear polyethylene tent stays 8 to 12 cm away from the X-slit. Wet plastic resting against emerging pinheads traps standing water and triggers bacterial rot.
- Upper Cross-Ventilation Holes plus Bottom Drainage Gap: Punch 8 to 12 circular holes (1.0 to 1.5 cm diameter) across the upper half of the polyethylene tent, and prop the bottom edge of the tent 2 to 3 cm above the rim of the drip tray (or use 38 mm micropore-taped ports on rigid monotubs). Because exhaled carbon dioxide has a molar mass of
44.01 g/molcompared with28.97 g/molfor dry room air, coolCO2exhaled by the mushroom cluster is roughly 1.52 times denser than air and sinks toward the tray floor. A 2 to 3 cm bottom perimeter gap allows heavyCO2to drain outward while warm convective air vents through the upper holes. - Fine-Mist Aerosol Wall Spraying (
< 50 microns): Use a continuous fine-mist aerosol sprayer producing droplets under 50 microns. Mist the interior plastic walls of the tent and the air space 25 to 30 cm away from the block 2 to 3 times daily, lifting the tent completely for 30 to 60 seconds each time to flush stagnant air (Field & Forest Products). Never jet coarse water droplets directly into the X-slit or onto developing caps. Just as vegetable seedlings require controlled boundary-layer transitions when moving outdoors (covered in our greenhouse seedling hardening-off guide), oyster primordia depend on steady evaporation without liquid waterlogging.
Takeaway: Fold the bag tight to prevent side-pins, keep the four X-slit flaps intact during pinning, and pair upper tent holes with a 2 to 3 cm bottom perimeter gap so heavy CO2 drains continuously.
Engineering Formulas & Worked Examples: Air Exchange, VPD, and Biological Efficiency
Sizing ventilation and tracking block moisture on an oyster mushroom growing kit can be quantified with three standard cultivation equations: fruiting tent air-exchange rate (ACH), boundary-layer vapor pressure deficit (VPD), and substrate biological efficiency (BE%).
1. Humidity Tent Air Exchange Rate (ACH) and CO2 Buildup
Air changes per hour (ACH) measures how many times the total air volume inside a fruiting tent or chamber is replaced with fresh room air (~420 ppm CO2) every 60 minutes:
ACH = (Q_flow × 60) ÷ V_tent
Where:
ACH= Air changes per hour (target4 to 8 ACHduring Stage 2 fruiting)Q_flow= Effective fresh-air volumetric flow rate in liters per minute (L/min)V_tent= Enclosed humidity tent volume in liters (L, where1,000 cm³ = 1 L)
Worked Example (40 L Countertop Tent):
Suppose you place a 2.2 kg oyster fruiting block inside a rectangular countertop humidity tent measuring 35 cm × 30 cm × 38 cm:
- Tent volume:
V_tent = (35 × 30 × 38) ÷ 1,000 = 39.9 L(approx.40 Lor0.04 m³). - To maintain 6 ACH during Stage 2 rapid cap expansion, the required fresh-air exchange rate is:
Q_flow = (ACH × V_tent) ÷ 60 = (6 × 40) ÷ 60 = 4.0 L/min(240 L/hr). - During active Day 6 to Day 8 expansion, a 2.2 kg colonized Pleurotus ostreatus block respires oxygen and evolves roughly
50 to 90 mL of CO2 per hour(0.83 to 1.50 mL/min). In an unvented 40 L tent (0 ACH) starting at ambient room level (420 ppm),CO2concentration rises at:Delta_CO2_per_hour = (70 mL/hr ÷ 40,000 mL) × 1,000,000 = +1,750 ppm/hr. - Within 45 minutes in an unvented tent, internal
CO2reaches420 + (1,750 × 0.75) = 1,732 ppm, crossing the1,500 ppmthreshold where cap differentiation stalls and stipes elongate into leggy stems.
2. Boundary-Layer Vapor Pressure Deficit (VPD) Across Stages
Vapor Pressure Deficit (VPD, in kilopascals kPa) measures the drying power of the air surrounding the mushroom cuticle by comparing saturation vapor pressure (e_s) at ambient temperature (T in °C) with actual vapor pressure:
e_s(T) = 0.61078 × exp((17.27 × T) ÷ (T + 237.3))
VPD = e_s(T) × (1 - (RH ÷ 100))
Worked Example at 18°C (64.4°F) for Pearl / Blue Oyster:
At T = 18°C, saturation vapor pressure is e_s(18) = 2.064 kPa:
- Stage 1 Pinning (
92% RH):VPD = 2.064 × (1 - 0.92) = 0.165 kPa. This gentle0.10 to 0.20 kPadeficit induces enough surface evaporation at the X-slit to trigger primordia without desiccating unprotected 2 to 5 mm pinheads. - Stage 2 Cap Expansion (
84% RH):VPD = 2.064 × (1 - 0.84) = 0.330 kPa. Stepping down to80% to 88% RHdoubles the evaporative driving force (0.25 to 0.41 kPa), drying off mist droplets within 1 to 2 hours so Pseudomonas bacteria cannot colonize the pileus while keeping the cuticle elastic. - Unprotected Kitchen Counter (
45% RH):VPD = 2.064 × (1 - 0.45) = 1.135 kPa. Exposing an uncapped X-slit to a> 1.0 kPavapor deficit strips moisture nearly 7 times faster than at 92% RH, shriveling pins into yellow-brown aborts within hours.
3. Substrate Moisture and Biological Efficiency (BE%)
Mycologists and commercial spawn producers evaluate kit yield using Biological Efficiency (BE%), defined as the fresh weight of harvested mushrooms divided by the dry weight of the substrate (Penn State Extension; Cornell Small Farms):
Dry_Substrate_Weight_g = Wet_Block_Weight_g × (1 - Moisture_Fraction)
BE% = (Fresh_Harvest_Weight_g ÷ Dry_Substrate_Weight_g) × 100
Worked Example (2,200 g Ready-to-Fruit Block at 68% Moisture):
- A standard 2,200 g (4.85 lb) oyster block hydrated to Penn State’s 68% moisture specification (
Moisture_Fraction = 0.68) contains:Dry_Substrate_Weight_g = 2,200 × (1 - 0.68) = 704 gof dry lignocellulosic matter and1,496 gof bound water. - If your first flush yields 520 g (1.15 lb) of fresh oyster mushrooms:
First_Flush_BE% = (520 ÷ 704) × 100 = 73.86% BE. - If a second and third flush add 260 g and 110 g of fresh mushrooms (
Total_Fresh_Harvest = 520 + 260 + 110 = 890 g), cumulative yield across all flushes reaches:Cumulative_BE% = (890 ÷ 704) × 100 = 126.42% BE. - Because fresh oyster mushrooms are 89.18% water (USDA FDC ID 168580), that 520 g first flush removes
520 × 0.8918 = 463.7 gof water directly from the block’s initial 1,496 g water reservoir (plus evaporative losses), explaining why blocks feel noticeably lighter after harvest.
Takeaway: Target 4 to 8 ACH (0.25 to 0.41 kPa VPD at 80% to 88% RH) during Stage 2 so a 2.2 kg block can convert its ~700 g of dry matter into 500 g or more of first-flush mushrooms (> 70% First-Flush BE).
Morphological Diagnostics: Separating High CO2 From Low Humidity and Bacterial Blotch
Oyster mushrooms display rapid, unmistakable morphological changes when gas exchange or humidity drifts outside target bounds. Misdiagnosing a high-CO2 ventilation problem as “low humidity” and sealing the tent tighter is the single most common cause of crop failure on a home kit.
| Visual Symptom on Kit | Primary Environmental Cause | Physiological / Pathological Mechanism | Immediate Corrective Action |
|---|---|---|---|
Long, spindly or thick “leggy” stems (stipe length > 2–3× cap width) with tiny trumpet caps (< 2 cm) |
High Ambient CO2 (> 1,000–1,500 ppm) from inadequate FAE (< 1–2 ACH) or low light (< 100–200 lux) |
Evolutionary sub-bark escape response: high CO2 signals the fungus is still inside rotting wood, suppressing cap expansion and elongating the stipe to reach open air |
Widen bottom tent gap to 3 cm, punch more 1.5 cm upper vents, lift tent 4–6× daily, and verify 500–1,000 lux light; caps will widen if caught before Day 6 |
| Dense, branching white “coral” or “horn” projections with zero distinct caps | Severe CO2 Accumulation (> 2,000–5,000 ppm) in an airtight tub/closet or total darkness |
Complete arrest of pileus differentiation; primordia branch repeatedly into sterile stipe-like projections | Remove sealed cover immediately; scrape stalled coral tissue cleanly down to firm white substrate and restore 4–8 ACH fresh air and 500–1,000 lux light |
Yellowed, browned, or shriveled pinheads that stall at 2–5 mm (“aborts”) |
Low Relative Humidity (< 70% RH / VPD > 0.6 kPa) during Stage 1 pinning or direct HVAC draft |
Delicate primordia lack a protective outer cuticle and lose water faster than mycelial hydraulic transport can replace it | Deflect room AC/heating vents, pick off dead aborted pins so they do not mold, and install a vented poly tent holding 90%–95% RH at the X-slit |
| Cracked, split, or leathery cap cuticles with dry, frayed margins during Days 5–8 | Sudden Stage 2 RH Drop (< 65%–70% RH) during rapid basidiocarp expansion |
Outer pileus epidermis dries and loses elasticity while internal flesh continues doubling in volume every 24 hours | Mist interior tent walls 2–3× daily with < 50 micron aerosol droplets to stabilize chamber humidity at 80%–88% RH |
| Sunken yellow-to-chocolate slimy lesions on caps, sticky surface, and putrid odor (Bacterial Blotch) | Excessive Standing Water on Caps (> 95% RH with zero evaporation for > 4–6 hours) |
Pseudomonas tolaasii bacteria multiply in persistent water films and secrete the lipodepsipeptide toxin tolaasin, lysing fungal cell membranes | Stop misting mushroom caps directly; increase airflow so surface moisture films evaporate within 1–2 hours; discard slimy fruiting bodies and sanitize tent |
| Fuzzy green, blue-green, or black patches on exposed substrate cut | Contaminant Mold Colonization (Trichoderma harzianum, Penicillium, or Aspergillus) on damaged/senescent tissue | Competitor molds germinate on unharvested rotting stem stumps, stagnant water pools, or nutrient-depleted substrate | Follow UF/IFAS SS662 guidance: do not consume mushrooms adjacent to active mold; discard contaminated bags or contact supplier |
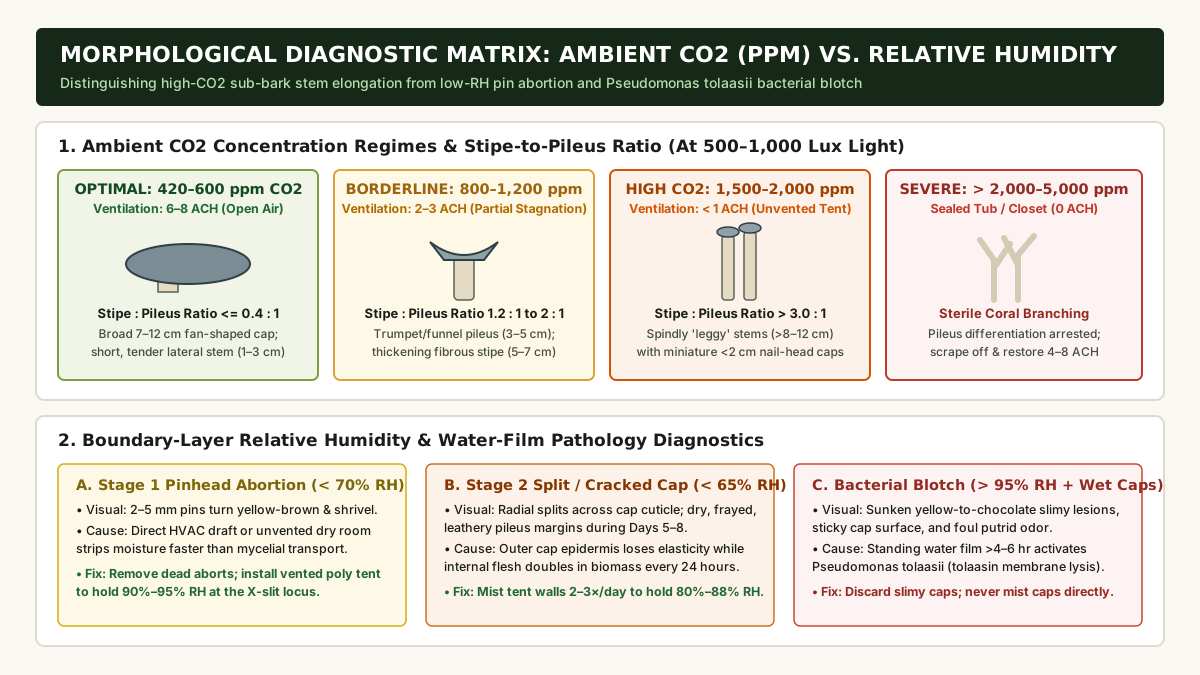
Why Oyster Kits Demand More Fresh Air Than Button or Shiitake Mushrooms
In wild forest ecosystems, Pleurotus ostreatus fruits laterally on standing dead hardwood trunks where wind currents continuously sweep away respired CO2 (~420 ppm background). Consequently, oyster mushrooms evolved a steep morphological sensitivity to carbon dioxide:
- Below
600 ppm CO2(4–8 ACH): Stipes remain short (1 to 3 cm), lateral, and tender, while pilei expand into broad, fleshy 7 to 12 cm oyster-shell fans (stipe-to-pileus length ratio <= 0.4:1). 800 to 1,200 ppm CO2(2–3 ACH): Stipes lengthen to 5 to 7 cm and toughen with chitinous fiber while caps roll into narrow 3 to 5 cm trumpets (stipe-to-pileus ratio 1.2:1 to 2.0:1).- Above
1,500 ppm CO2(< 1 ACH): Stipes stretch past 8 to 12 cm (stipe-to-pileus ratio > 3.0:1) topped by nail-head caps under 2 cm. Once a stipe elongates during Days 3 to 5, loweringCO2cannot shrink the existing stem, though restoring 4 to 8 ACH prior to Day 6 allows the cap at the tip to expand into an umbrella.
Takeaway: Use the stipe-to-pileus ratio as your real-time CO2 gauge (<= 0.4:1 indicates < 600 ppm CO2) and cap surface sheen as your humidity gauge (satin-matte and dry to the touch within 60 minutes of misting indicates 80%–88% RH).
Harvest Timing by Cap Margin Geometry and USDA FDC ID 168580 Nutritional Profile
Because oyster fruiting bodies double in biomass every 24 hours between Day 5 and Day 8 (Field & Forest Products; UF/IFAS Extension SS662), harvesting 36 hours too early sacrifices up to half of your harvest weight, whereas harvesting 24 hours too late results in tough flesh and heavy indoor spore discharge.
1. Three-Stage Pileus Margin Uncurling Timeline
Track the cross-sectional curvature of the outer cap edge (pileus margin) on the largest caps in the cluster:
- Stage A: Immature Inrolled Margin (Days 4 to 6): The outer rim of each cap is tightly rolled downward and inward toward the decurrent gills. Flesh is dense and actively expanding. Action: Hold 80% to 88% RH and 4 to 8 ACH; wait 24 to 48 hours.
- Stage B: Optimal Harvest Window, Nearly Horizontal Plane (Days 7 to 9): The downward-curled margin unrolls and flattens toward a horizontal plane, retaining only a slight downward lip at the very perimeter. Culinary tenderness, cell-wall beta-glucan integrity, and fresh weight peak during this 12 to 24 hour window. Action: Grasp the base of the entire cluster right at the X-slit and twist firmly while pulling outward (UF/IFAS SS662; Field & Forest Products) so all joined stems come off together without leaving decaying stumps in the bag.
- Stage C: Overmature Upturned Concave Margin (Days 9 to 11+): The cap margin curls upward into a concave saucer or funnel with wavy, splitting edges. At this stage, the basidia release millions of white-to-lilac-grey spores per minute, coating nearby surfaces in a fine dust that acts as an indoor respiratory sensitizer while draining block moisture needed for the second flush.
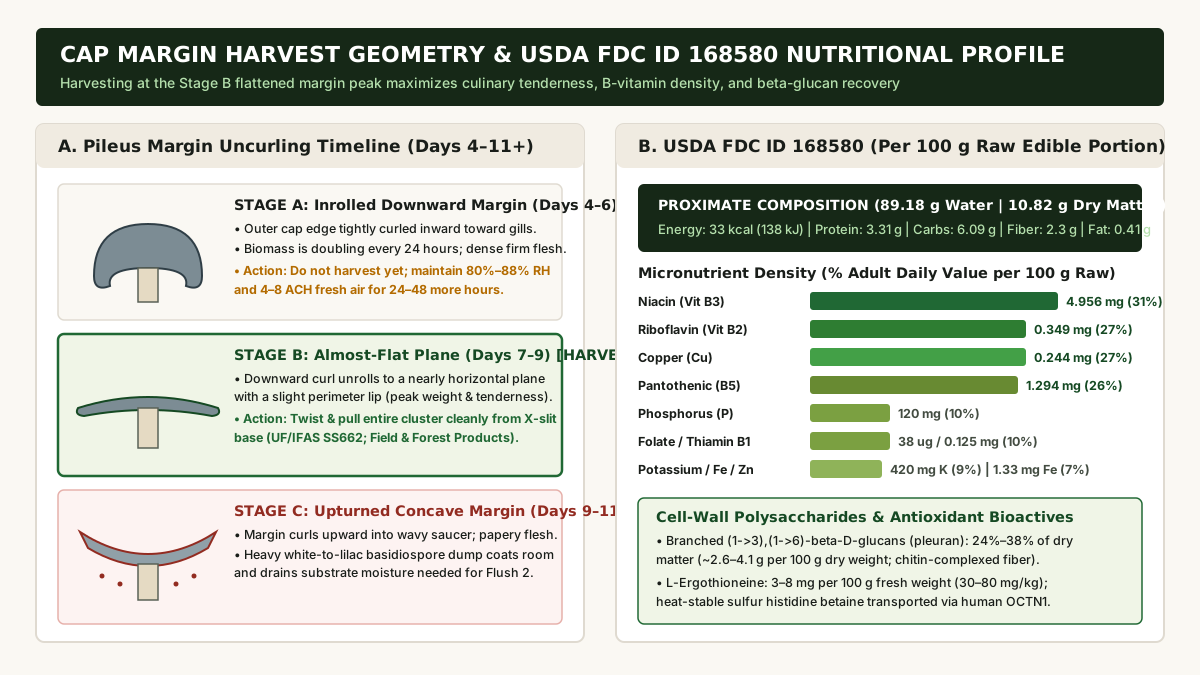
2. Oyster Mushroom Nutrition and Fungal Bioactives (USDA FDC ID 168580)
For home growers evaluating oyster mushroom nutrition, the U.S. Department of Agriculture Agricultural Research Service (USDA FoodData Central FDC ID 168580, SR Legacy dataset for raw Pleurotus ostreatus) and peer-reviewed mycological analyses document a high concentration of B-complex vitamins, trace minerals, and structural cell-wall polysaccharides per 100 g raw edible portion (and scaled below to a typical 500 g first-flush kit harvest):
| Nutrient or Bioactive Compound | Amount per 100 g Raw (Pleurotus ostreatus) | Amount per 500 g Kit Harvest (First Flush) | % Adult Daily Value (per 100 g Raw) | Primary Physiological & Culinary Note |
|---|---|---|---|---|
| Water | 89.18 g | 445.90 g | N/A (89.2% moisture) | High turgor moisture; sauté dry in a hot pan first so water evaporates before adding oil |
| Food Energy | 33 kcal (138 kJ) | 165 kcal (690 kJ) | ~1.7% DV | Low-calorie, nutrient-dense whole fungal food (USDA FDC 168580) |
| Protein | 3.31 g | 16.55 g | ~6.6% DV | Complete amino acid profile including glutamic and aspartic acids (umami savoriness) |
| Total Carbohydrate | 6.09 g | 30.45 g | ~2.2% DV | Includes structural chitin and beta-glucan cell-wall polymers; 1.11 g total sugars |
| Dietary Fiber (Total) | 2.30 g | 11.50 g | ~8.2% DV | Predominantly insoluble chitin and soluble/insoluble branched beta-glucans |
| Total Lipid (Fat) | 0.41 g | 2.05 g | ~0.5% DV | 0.06 g saturated, 0.12 g polyunsaturated (linoleic acid); 0 mg cholesterol |
| Niacin (Vitamin B3) | 4.956 mg | 24.78 mg | ~31% DV | Coenzyme precursor (NAD+ / NADP+); one of the richest non-animal sources of B3 |
| Riboflavin (Vitamin B2) | 0.349 mg | 1.745 mg | ~27% DV | Essential flavoprotein cofactor (FAD / FMN) for cellular energy metabolism |
Copper (Cu) |
0.244 mg | 1.220 mg | ~27% DV | Required for cytochrome c oxidase, iron transport, and superoxide dismutase (SOD) |
| Pantothenic Acid (Vitamin B5) | 1.294 mg | 6.470 mg | ~26% DV | Required for Coenzyme A (CoA) synthesis and fatty acid metabolism |
Phosphorus (P) |
120 mg | 600 mg | ~10% DV | Structural component of ATP, nucleic acids, and phospholipids |
Folate (Vitamin B9, DFE) |
38 ug | 190 ug | ~10% DV | One-carbon methyl donor for DNA synthesis and amino acid interconversion |
| Thiamin (Vitamin B1) | 0.125 mg | 0.625 mg | ~10% DV | Cofactor for pyruvate dehydrogenase and alpha-ketoglutarate dehydrogenase |
Potassium (K) |
420 mg | 2,100 mg | ~9% DV | Intracellular electrolyte (0 mg sodium in raw pileus tissue) |
Iron (Fe) & Zinc (Zn) |
1.33 mg Fe / 0.77 mg Zn | 6.65 mg Fe / 3.85 mg Zn | ~7% DV each | Bioavailable non-heme iron and catalytic zinc |
(1->3),(1->6)-Beta-D-Glucans (Pleuran) |
~2.6–4.1 g (24%–38% of dry matter) | ~13.0–20.5 g | Bioactive fiber | Branched cell-wall polysaccharides complexed with chitin; retained during cooking |
| L-Ergothioneine | ~3.0–8.0 mg (30–80 mg/kg fresh wt) | ~15.0–40.0 mg | Fungal antioxidant | Heat-stable sulfur-containing histidine betaine transported via human OCTN1 (SLC22A4) |
3. Post-Harvest Cold Storage and Preparing the Block for Flush 2
Immediately after twisting the Stage B cluster from the X-slit, brush off any clinging sawdust or straw particles from the stem base and store the harvested mushrooms in a breathable brown paper bag or vented cardboard container inside the refrigerator at 1 to 4°C (34 to 40°F) (University of Kentucky Extension CCD-CP-079). Never seal fresh oyster mushrooms in an airtight unperforated zip-top bag, where continuing post-harvest respiration condenses liquid water and accelerates bacterial spoilage within 48 hours.
Next, inspect the exposed X-slit on your fruiting block and pick off any spongy white stem remnants so they do not mold during the rest period. Follow our oyster mushroom second-flush care guide to log your block’s post-harvest weight and apply your specific supplier’s rest or rehydration protocol (including why tropical Pink Oyster blocks must never be cold-shocked in the refrigerator). Once a block completes 2 to 4 flushes and is retired to the garden compost pile, see our guide on blending spent mushroom substrate into a raised bed soil mixture and our explainer on how spent mushroom substrate and compost differ from liquid compost tea.
Takeaway: Harvest the entire cluster at Stage B when the cap margin unrolls to a nearly horizontal plane, store fresh caps in a breathable paper bag in the refrigerator, and clean all stem remnants from the X-slit before resting the block for its second flush.